This page gives an overview over the different documentation chapters.
This is the multi-page printable view of this section. Click here to print.
Documentation
- 1: Getting Started
- 1.1: System Requirements
- 1.2: A Note on Shared Hosting
- 1.3: Installation
- 1.4: Configuration
- 1.5: Cronjobs
- 2: Concepts
- 3: Contributing Guidelines
1 - Getting Started
What does your user need to know to try your project?
Crepes is a self-hosted website that allows you to offer events to users in which they can register themselves. Think of it like a content-management system, but for events. It was originally designed to organise in-real-life courses, but has since been transitioning to a more general purpose event management system. It is still early days for the project, but it is stable enough that it can be used in production.
This chapter guides you through the installation and configuration process.
Get started by following the links below!
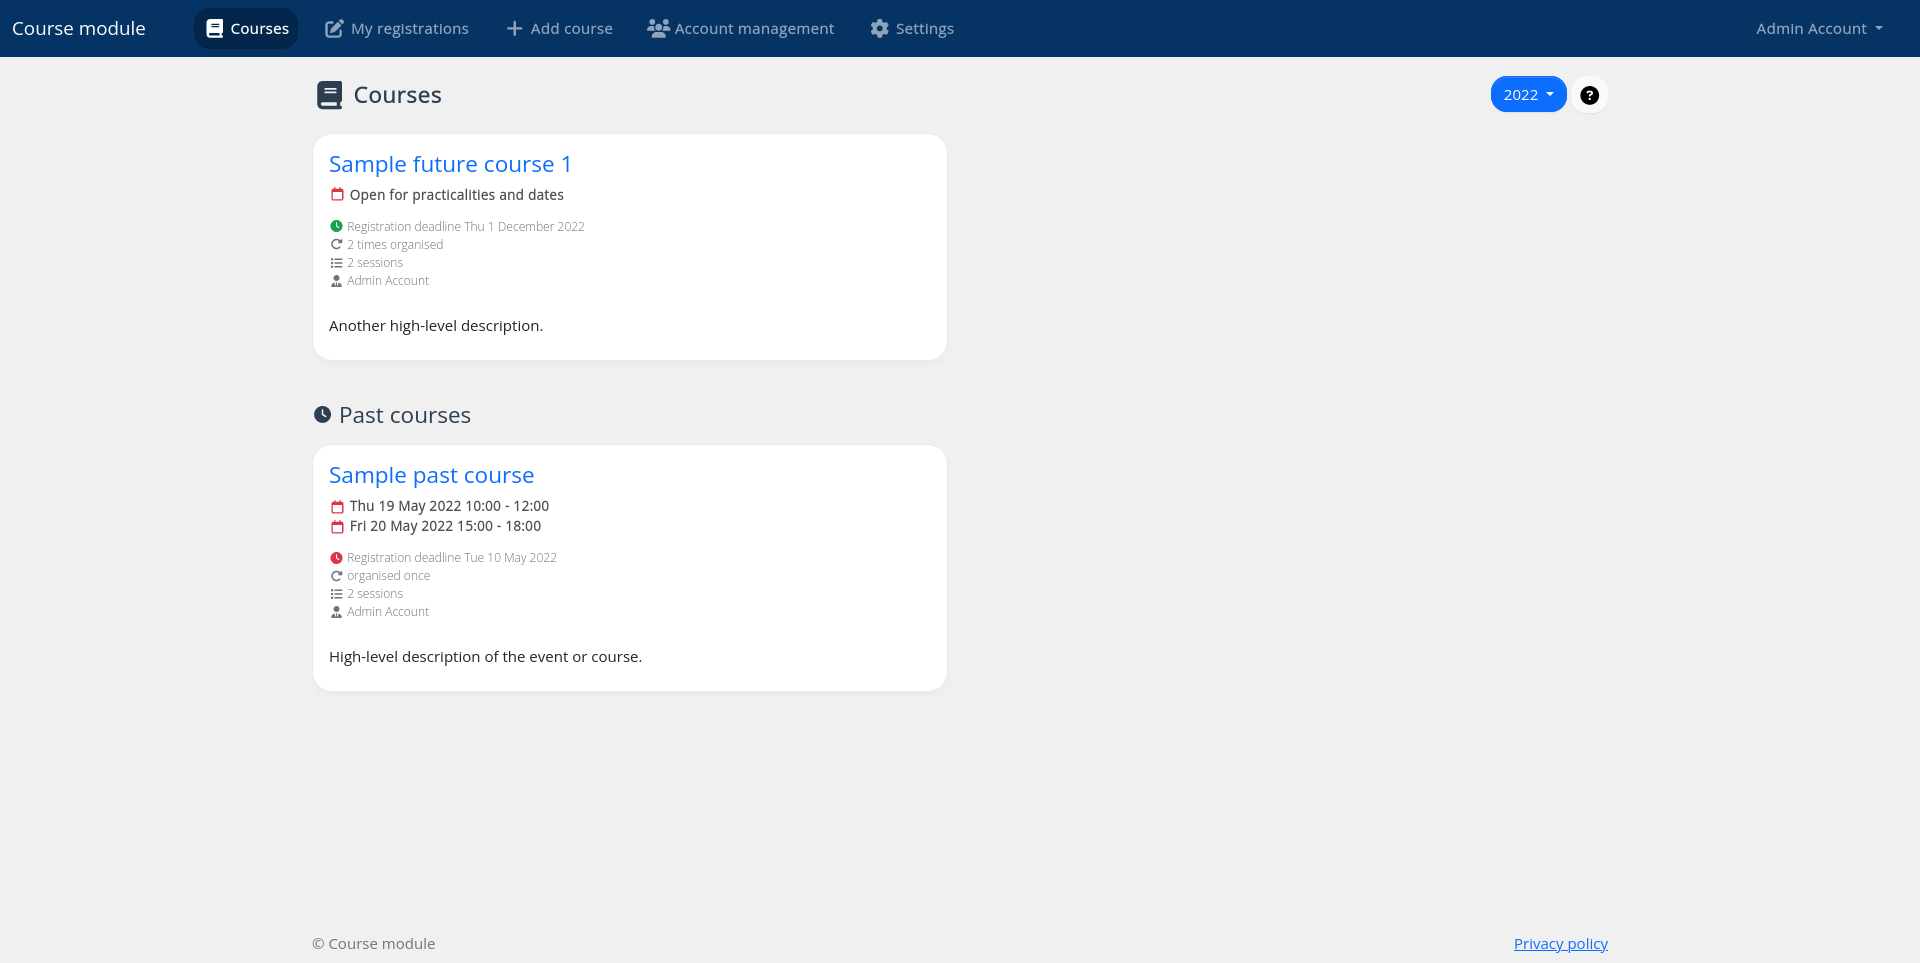
Click to enlarge screenshot
1.1 - System Requirements
System requirements for the installation.
The requirements are fairly standard for a web server running PHP, also on shared hosting.
| Requirement | Version | Details |
|---|---|---|
| Composer | >= 2.2 | Composer is the back-end package manager |
| HTTP server | Examples: nginx, Apache | |
| PHP | >= 8.1 | |
| PHP extensions |
| |
| SQL database | Examples: MySQL, MariaDB, PostgreSQL | |
| Yarn | >= 1.20 | Yarn is the front-end package manager. This is strictly not necessary to install on the server as you can build the front-end assets locally as well. |
1.2 - A Note on Shared Hosting
What you should beware of when using shared hosting.
The document root of the application is the public folder.
Do not place the whole application in the document root, or otherwise your risk creating security issues!
It is especially dangerous if the environment file .env is readable by the outside world because it contains application secrets.
The safe way to set up a Laravel application (like this application is) on shared hosting is by placing the whole application directory outside of the document root in a dedicated folder. For example you can name that folders crepes.
The files in the public folder should be the ones placed in the document root.
You then need to make a few modifications to public/index.php in order to accomodate for the changed application directory structure. In particular lines 10 and 11 need changes. The code initially looks like this:
| |
If your document root is at /public_html, and the application code is at /crepes, you should change the code to:
| |
1.3 - Installation
Installing the application.
This page will guide you on how to install the dependencies for the application.
Download the application source code
The first step is to get a copy of the source code to the machine you want to deploy to. At this moment, the only way to obtain it is via a git clone or download from the repository. In the future we might add a way to install it via composer directly.
git clone https://github.com/nielsdos/crepes installation-directory
cd installation-directory
Application dependencies
We use the Composer package manager to manage our back-end (PHP) dependencies, while Yarn is used for the front-end dependencies.
Back-end dependencies
Install the dependencies for production as follows.
composer install --no-devIf you’re setting up a development environment, you should not pass the
--no-devoption.
Front-end dependencies
Install the dependencies and build the front-end assets as follows.
yarn install
yarn prod
If you’re setting up a development environment, you can use
yarn devinstead ofyarn prod. You can also use the watch option to automatically rebuild front-end assets upon changes withyarn watch.
1.4 - Configuration
Configuring the application.
This page will guide you on how to configure the application.
Creating an environment file (.env)
The configuration settings are stored within the .env file.
To create one you should copy the example file .env.example to .env.
Make sure that the .env file is never accessible by the outside world: it contains application secrets such as your database password!
Editing the environment file
You should modify the .env file to configure the application. This includes settings for the database, reCAPTCHA settings, and email settings. In particular, the following keys should be at least set-up:
APP_URLshould point to the public URL where your application is hosted, without trailing slashMAIL_*DB_*NOCAPTCHA_*, for reCAPTCHA To get reCAPTCHA keys, please use the reCAPTCHA admin console and select reCAPTCHA v2.
You can furthermore also specify your desired time zone, locale, etc.
If you wish to modify the URLs from the default course to event (or something else entirely), you can modify the following entries:
APP_ROUTE_CUSTOMIZED_NAMES_COURSEAPP_ROUTE_CUSTOMIZED_NAMES_SUBSCRIPTIONSAPP_ROUTE_CUSTOMIZED_NAMES_SUBSCRIBEAPP_ROUTE_CUSTOMIZED_NAMES_UNSUBSCRIBE
Generating the application key
Finally, you should generate an application key. The application key is used to perform encryption and decryption routines within the application. It is also stored in the .env file.
You should only generate this once, and never change it again later unless the key gets leaked. If you regenerate the key, all sessions and signed URLs will become invalid.
php artisan key:generateSetting up the database
The database schema is handled via migrations. These are scripts that build or upgrade your database schema incrementally in a way that can also be rolled back. If you’re interested you can read more about them in the Laravel documentation.
If your database settings are correct, you should run the following command to set-up the database. Make sure your database actually exists as this will not be created by the script!
php artisan migrateEvery time you upgrade the application you should re-run the above command to make sure your database schema is always the latest version.
Caching
To improve the performance of the application, the configuration, routes, views and icons should be cached. You can easily to this by executing the optimize command, which internally performs the following caching commands:
php artisan config:cache
php artisan route:cache
php artisan icons:cache
php artisan view:cache
Creating an administrator user
There are no initial users provided by the application. You should therefore create an initial administrator user. You can do so by executing the following command and following the instructions on your screen.
php artisan crepes:create-userNext steps
Your application should now be set up and you should be able to visit the public URL and see it in action! The next step is to set-up the cronjobs and use your administrator account to create some content.
1.5 - Cronjobs
Setting up the cronjobs for the application.
Cronjobs are a way to automatically execute scheduled commands. They are used in the application to run jobs from the queue such as sending notification emails, and also to send reminders.
A note on the queue
If you plan on listening to the queue using Laravel’s built-in tools instead of using a scheduled job, you can use the following command instead of setting up a cronjob for the queue. A cronjob to send reminders is still necessary.
php artisan queue:listenCronjob configuration
The following two jobs should be run:
php artisan queue:work --stop-when-empty --tries=5php artisan crepes:send-reminders
An example crontab configuration could look like:
0 10 * * * cd installation_directory && php artisan subreminders:send >> /dev/null 2>&1
*/20 * * * * cd installation_directory && php artisan queue:work --stop-when-empty --tries=5 >> /dev/null 2>&1
Make sure to replace
installation_directorywith your installation directory!
2 - Concepts
This gives an overview of the main concepts in the application.
Every event or course consists of 1 or more session groups, and each session group has 1 or more sessions. A session represents one activity within the event or within the course. These sessions can be organised at different times and places. If you do not wish to make such a distinction, you can leave your event at a single session.
Session groups are used to split an event or course into different groups. The sessions are still the same content-wise, but may be organised in different times and places than the sessions in other groups. Splitting into groups effectively allows to organise the same event multiple times. Again, if you do not wish to utilise this, you can keep the amount of session groups to the default of one group.
3 - Contributing Guidelines
How to contribute to the project or the docs.
Both the project and its documentation can use a helping hand!
3.1 - Contribution Guidelines For Documentation
How to contribute to the documentation
We use Hugo to format and generate our website and the Docsy theme for styling and site structure. Hugo is an open-source static site generator that provides us with templates, content organisation in a standard directory structure, and a website generation engine. You write the pages in Markdown (or HTML if you want), and Hugo wraps them up into a website.
All submissions, including submissions by project members, require review. We use GitHub pull requests for this purpose. Consult GitHub Help for more information on using pull requests.
Updating a single page
If you’ve just spotted something you’d like to change while using the docs, Docsy has a shortcut for you:
- Click Edit this page in the top right hand corner of the page.
- If you don’t already have an up to date fork of the project repo, you are prompted to get one - click Fork this repository and propose changes or Update your Fork to get an up to date version of the project to edit. The appropriate page in your fork is displayed in edit mode.
Previewing your changes locally
If you want to run your own local Hugo server to preview your changes as you work:
Follow the instructions in Getting started to install Hugo and any other tools you need. You’ll need at least Hugo version 0.105 (we recommend using the most recent available version), and it must be the extended version, which supports SCSS.
Fork the documentation repo repo into your own project, then create a local copy using
git clone. Don’t forget to use--recurse-submodulesor you won’t pull down some of the code you need to generate a working site.git clone --recurse-submodules --depth 1 https://github.com/nielsdos/crepes-docs.gitRun
hugo serverin the site root directory. By default your site will be available at http://localhost:1313/. Now that you’re serving your site locally, Hugo will watch for changes to the content and automatically refresh your site.Continue with the usual GitHub workflow to edit files, commit them, push the changes up to your fork, and create a pull request.
Creating an issue
If you’ve found a problem in the docs, but you’re not sure how to fix it yourself, please create an issue in the documentation repo. You can also create an issue about a specific page by clicking the Create Issue button in the top right hand corner of the page.
Useful resources
- Docsy user guide: All about Docsy, including how it manages navigation, look and feel, and multi-language support.
- Hugo documentation: Comprehensive reference for Hugo.
- Github Hello World!: A basic introduction to GitHub concepts and workflow.
3.2 - Contribution Guidelines For The Project
How to contribute to the project
Please always target the develop branch in your pull requests.
If you don’t know where to start, you can always try to look at the open issues in the repository to find missing features or bugs that should be fixed.
If you don’t have a particular feature of bugfix in mind, but would still like to make a contribution, you can always check the roadmap and work on something you feel is missing from the project.
Setting up a development environment
You can follow the same installation instructions for a production environment, except for the following changes.
Updating .env
It is recommended to change the .env file to have the following properties set:
APP_ENV=development
APP_DEBUG=true
Installing development dependencies
Do not pass --no-dev to the composer install command line:
composer install
Front-end dependencies can be installed with:
yarn install
Developing
You can start the built-in Laravel server using:
php artisan serve
To make changes to the front-end JavaScript and CSS code, you should be using:
yarn watch
to watch for changes and automatically rebuild the affected front-end files.
Testing
We use PHPUnit as our testing framework with a test database called courses_testing. Make sure to setup an empty database with that name in order to run the tests. Please make sure to include regression tests if you are fixing a bug, or feature tests when adding a new feature.
To run the tests, use:
vendor/bin/phpunit
If you wish to generate a coverage report whilst running the tests, you can use:
php artisan view:clear;XDEBUG_MODE=coverage vendor/bin/phpunit --coverage-html reports
Static analysis
We use the PHPStan static analyser tool to find bugs earlier. We recommend that you run the tool and fix any errors that pop up by your changes before opening a pull request.
To run the tool you can use:
vendor/bin/phpstan analyse --memory-limit=1G